For this we need: a cell under the egg, newspaper, cardboard, glue (pencil and PVA), scissors, a simple pencil, needle, clothespins, 2 brushes (one for glue, the other for the stain) stain, two tanks (under the glue and stain ), rubber gloves.
The store bought the cell under the egg. Cut it and I got two forms, for 12 eggs.

Instead of a paper cell, you can take a cell from a Kinder.

Piece of cardboard cut to the shape of the cell, but approximately 5 mm larger on each side (for glueing tubules). Perhaps the allowance will be different, it all depends on how thick you'll be doing itself a tube. Make one test tube and see what stock needs to be done.

For the bottom of our basket cut out two identical boxes. (If you take a thick cardboard, it is enough for one cardboard). I thin it is.

Now glue PVA glue two cartons together and put them under pressure to dry.
While our bottom of a dry, let us deal tubes. To do this, take a newspaper and cut into strips.

This page of the newspaper cut into 5 strips.

Now begin to twist the tube. If the wicker baskets of rolls wind onto the diagonal, then we do they will be screwed onto a straight needle. Lubricates the edge of the strip with glue (pencil), cheat on needle.

The other side, too, oil the glue, spinning to the edge of tube well stuck. Then remove from the needles and tubes ready.

Thus we turn tubes for the whole basket. When the thickness of the tubes, which I spun I got to 12 tubes on each side of the basket.
Tubules to the basket ready.

Cardboard for the bottom of dried up, now we will finish bottom of a basket. To do this, take a sheet newspapers and crushes it into a "lump."

Crumpled paper, expand. Cardboard oil the glue (PVA) and paste to a crumpled newspaper.

The edges of the paper wrap and glue, too.

Now to dry our bedplate put again under the yoke.
Until the bottom of a dry, we make tubes for decorating baskets. And we decorate it'll pigtails.These tubules, we will not twist on the line, and diagonally. Sheet of the newspaper does not cut the 5-strips (as we did), and 6. And a torsional angle. With such twisting tubes will be on the one hand already on the other broader.

Now, these tubes of glue 2, inserting a narrow margin of one (smeared with glue (pencil) in a wide edge on the other. We have a long tube are obtained.
Getting out of long straws to weave a braid. Take 3 long rolls, connect them together and glue the edge of the tape (to make it more convenient to weave). Sami rolls "roll" (make them flat), to braid turned out nice and flat tubes for easier weaving bend. I rolled out this way: take a pack of glue (a pencil) and kata her ducts.

Edge of the tubules did not roll out the dough (leave until the "chubby"). This is in order to be able to extend (if necessary) tubules. Begin to weave a braid. When the tube (with netting) are over, dokleivaem another tube and roll out, too. Scourge further.

The length of the braids should be slightly larger than the perimeter of the basket (when the whip to try on our cell under the egg). The tip of the pigtail of us attaches a pin to our queue is not undone. When the queue is ready once again its "laminated" or mapping hammer to give the braids flat appearance.

For decorating baskets, we need two such braids. If you want to make a basket handle, then make another braid, only shorter in length.
While I'm weaving braids, for the bottom of a basket of dried up. Begin to make itself a basket.Take the tube, measure the length of the basket (delete cut off) and begin to stick to the bottom.Penne paste on PVA glue.

When the 1-st row of tubules is glued, begin to glue the 2 nd. Tubules of first-line oil the glue and sticking the next row. And so to the end, until all the glue tube. And here's our basket ready.

Now inside the basketful lubricates PVA glue and insert the prepared form cells (projecting parts of the cell adhesive grease better too).

I decided to make a basket with handle. For this queue we have ready. Glue it to the basket. To braid tightly clung to the basket, hold her clothes pins and leave it for some time (to glue a little dried out).

Now decorate the basket by the pigtails, which we have prepared. The upper edge of the basket oil the glue PVA glue and pigtails, are also pressing her clothespins. Two ends of dreadlocks neatly docking and presses a pin. Do not worry if the glue to get more than you need. This does not affect the beauty of your basket.

While attached upper tail, we are starting to stick the bottom. Only difference is that the clothes pins, we can not squeeze it. Therefore, presses her fingers and waiting for the glue "grabbed".

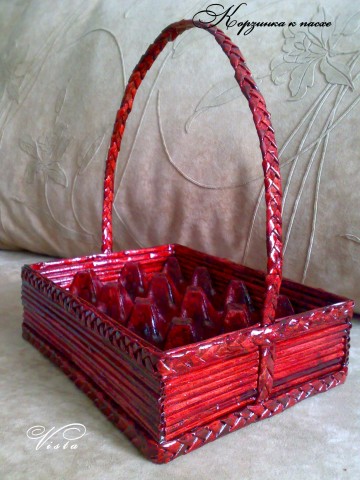
Here's our basket and ready. It remains only to give it color, and it is fully ready. Cover will be as follows: in the tank (I have a small metal bowl), pour 1 tablespoon of PVA glue and breed it with water, 1 tablespoon, too. All this is well stirred and completely cover our basket that composition.Make sure that all areas of the basket has been carefully covered (inside the cell is also covered by this structure). Give a completely dry and once again cover the same composition of the whole basket. After such coverage, you will see that the paper was solid, and there was glitter on the basket.
After such coverage, my basket is completely dry, now I'll cover it stained. I have a stain color of Oregon. "

Pour into a container stain (for this I simply cut off the plastic bottle) on hand put on rubber gloves (not to soil our hands) and start covering our basket. Cart is also covered by two layers of stain, giving each layer to dry thoroughly.
Here's our basket and ready.

Không có nhận xét nào:
Đăng nhận xét